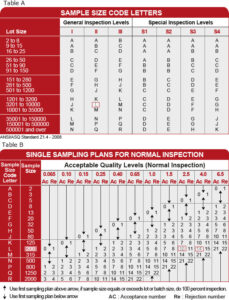
Eagle Eyes use the well-proven and widely adopted international inspection standard ANSI/ASQ Z1.4-2008 (equivalent to MIL-STD-105e, ISO2859, NF06-022, BS6001, DIN40080, and GB2828) to measure the Acceptable Quality Limit (short as AQL) of the products inspected.
Definition and application of ‘AQL’
‘AQL’ stands for ‘Acceptance Quality Limit’, and is defined as the ‘quality level that is the worst tolerable’ (per ISO 2859 standard). ‘AQL’ is called the ‘Limit’. The ‘AQL tables’ are statistical tools at the disposal of buyers for product inspections. General Inspection Level II is mostly applied to determine the inspection sample size for cosmetic and functional check. Special Inspection Level will be applied for safety, reliability, performance or other special test if whereas applicable.
In practice, three types of defects are distinguished.
•Critical defects: totally unacceptable, a user might get harmed, or regulations are not respected.
•Major defects : these products would usually not be considered acceptable by the end user.
•Minor defects : there is some departure from specifications, but most users would not mind it.

How do I determine the right sample size and acceptance defective number?
These proportions vary in function of the product and its market. Components used in building an airplane are subject to much lower AQL limits. Yet, consumer products are subject to a higher AQL limits.
For example, if there is an order of 6,000 products, (See AQL Table A above) it falls on “L” per the default General Inspection Levels II. Its sample size will be 200 pcs(See AQL Table B above).Then according to the default acceptable quality limit value for most consumer goods (Critical 0%, Major 2.5%, Minor 4.0%), the maximum acceptable defective number will be:
Critical: 0 defective products (above 1 Critical defective, order considered rejected.)
Major: 10 defective products (above 11 Major defectives, order considered rejected.)
Minor: 14 defective products (above 15 Minor defectives, order considered rejected.)
If the quality passes inspection, the lot is accepted, it is commonly perceived that there is a maximum of 2.5% of major defect units in the lot (with a failure risk percentage of less than 5%).
If the quality fails inspection, the lot is rejected, it is required that the supplier should rework the whole lot to fix the defectives instead of reworking on the AQL sample size inspected only. A Re-inspection afterwards is strongly suggested.
Note: A Defective is defined as a unit of product that contains one or more defects. A Defect is defined as any non-conformance of the inspected unit of product with specified requirements. A single defect is taken into account per each defective unit, If the same sample has several defects, only the most serious defect is counted. In the case of critical defects, the entire shipment must be rejected as a matter of principle and clients shall consult for a decision.


