
Key Inspection Points and Procedures for Hubcap Inspection
Here is a detailed breakdown of the key inspection points and the standard inspection for hubcaps, presented in English. This structure is suitable for a Quality Control (QC) checklist or a formal inspection report.
Key Inspection Points
When inspecting hubcaps, the focus is on aesthetics, fit, and material integrity. The key points are as follows:
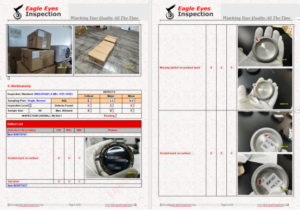
1. Visual Appearance & Surface Quality
This is the most critical aspect for consumer acceptance.
Color & Gloss: Check against the approved sample (master sample) for color matching, uniform gloss, and shade consistency.
Scratches & Scuffs: Inspect the entire surface for any scratches, abrasions, or friction marks.
Blemishes: Look for bubbles, pinholes, orange peel, flow marks, or contaminants embedded in the paint or material.
Plating/Coating Quality (if applicable): Ensure chrome or painted surfaces have good adhesion, no peeling, no corrosion, and a mirror-like finish.
Decals / Logos: Verify that any printed logos or decals are correctly positioned, clear, sharp, and have no peeling edges.
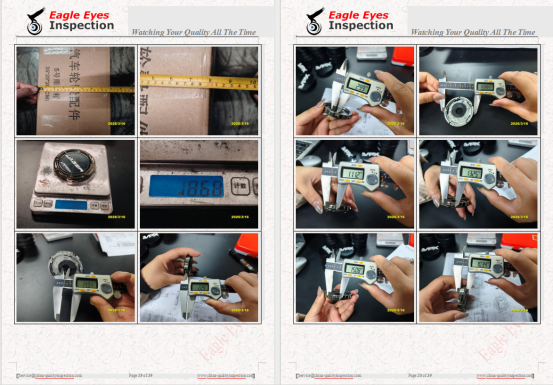
2. Dimensional Accuracy
Ensures the hubcap will fit the wheel properly.
Overall Diameter: Measure to ensure it matches the wheel size (e.g., 15-inch, 17-inch).
Fitment Clip/Retention Ring: Check the dimensions and spring force of the metal clips or retention ring. This is vital for a secure fit without rattling.
Valve Stem Hole: Verify the hole for the tire valve stem is correctly positioned, sized, and has smooth edges to prevent damage to the valve.
Fit Test: Mount the hubcap on a matching rim to check for a snug, secure fit. It should not be too loose (risk of falling off) or too tight (difficult to install).

3. Material & Construction
Material Type: Confirm the material is as specified (e.g., ABS Plastic, Polypropylene, Nylon) and feels robust.
Structural Integrity: Check for any cracks, warpage, or weak points, especially around the clip attachments.
Backside Finish: Ensure the backside is clean, free of sharp flash (excess plastic), and has a neat appearance.
4. Assembly & Component Security
Clip Attachment: If metal clips are attached, ensure they are firmly seated, evenly spaced, and not bent or missing.
Emblem Attachment: If the center emblem is a separate piece, ensure it is securely attached and cannot be easily pushed out.
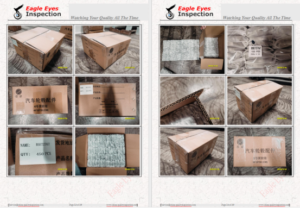
5.Verify the carton markings (Product name, quantity, date code, PO number).
Check the outer carton quality for damage and moisture resistance.
6.Functional Check (Fit Test):
Take a sample hubcap and install it on the appropriate wheel rim. Check for:
Ease of installation.
Secure retention (try to pull it off by hand).
No rattling or movement after installation.
Proper alignment with the valve stem hole.

